Crafternoon Tea Preemie Hats

Some ladies in my Sunday School class are interested in learning to knit and crochet.  We decided to add a missions component to the learning experience and make preemie hats to donate to local NICUs.  We had our first meeting yesterday and it was a blast!  We taught some crochet skills and made some hats.  I wanted to show off some of the hats and give the ladies some digital resources concerning what we learned yesterday.

20140406-153518.jpg

Stitches Learned

Yesterday we taught the basics of crochet to the beginners.  We taught some combination of the following stitches.  If you didn’t learn all of them, no big deal!  You can learn them next time.  If you have any questions, feel free to ask Shanda or me anything you would like.  The links below describe the stitches using words and figures.  The Crochet Crowd also provides a great series of YouTube videos for beginners.  After you learn these basic stitches, you can make any of the hats featured above!

Patterns

I had several patterns printed out yesterday and wanted to make them digitally available to everyone.  I found these patterns on Ravelry, which is a great source for everything knitting/crocheting.  If you join Ravelry, friend me!  My profile is here.  Feel free to be creative with the patterns!

Micro Preemie Hats – Crochet

Both of the hats we made have an added on edging.

20140406-153750.jpg

Wrapped with Love – Crochet

20140406-153532.jpg

Baby Cowboy Hat – Crochet

This turned out looking a little more like a Fedora than a cowboy hat.  I might edit it a little next time I made it.

20140406-153915.jpg

Baby Bear Hat – Knit

I made one edit to this pattern.  The pattern calls to knit until the hat is 6″ long.  That is very long for a preemie hat.  I knit it to 4.5″.  It looks about right.

20140406-154110.jpg

Preemie Football Hat – Knit

20140406-154027.jpg

Enjoy the patterns and feel free to ask me questions!

20140406-153518.jpg

Mad Hatter Crochet Challenge – Absolem

I posted last week about the Crochet Crowd’s Mad Hatter Crochet Challenge.  Since I really enjoyed the creativity of designing the decorations for the first hat, I decided to make a second hat.  I chose to base the hat on Absolem, the hookah smoking caterpillar in Tim Burton’s Alice in Wonderland.  I knit the hat holding together two colors to achieve the look of a smoke-filled teal and grey background.   I crocheted the brim of the hat in a tan color to resemble Absolem’s mushroom and embroidered spots on the mushroom.  I free crocheted Absolem’s head and body and embroidered all of his features before sewing him on the side of the hat.  I also free crocheted the hookah and smoke rings.  He turned out beautiful.  My gauge was a little off on the the first hat, so I went down a hook size for this hat.  The shape of the hat turned out a lot better.

20140406-101318.jpg

20140406-101426.jpg

20140406-101446.jpg

20140406-101510.jpg

Owl Baby Hat

My cousin Amber asked if I could come up with a pattern for a baby owl hat.  I combined the hat from my Hello Kitty Hat with an adorable owl keychain I saw on Ravelry.  The outcome was quite cute.  She wanted the main hat color to be peach.  I usually work in jewel-tones, which aren’t available in baby yarn.  I made this hat in pastel baby yarns.  The yarn is so unbelievably soft!  It was quite a bit less stretchy than what I normally use, so I had to start over with larger needles halfway through the project.  I should actually start recording my gauge and experience with different fibers.

20140310-195753.jpg

20140311-173346.jpg

Disclaimer:  Feel free to make this pattern for your personal use, for your platypus, for charity, or to sell.  The only thing I ask is that you please do not sell it on Etsy.  If you are interested in purchasing a koozie from my Etsy store, you may do so here.

Materials:

  • 5 Size 8 Double Pointed Knitting Needles
  • US Size 0 Crochet Hook
  • US Size 2 Crochet Hook
  • 1 Skein Bernat Softee Baby in Soft Peach (P)
  • Small amounts of crochet thread in black (K) and white (W)
  • Small amount of orange yarn (O)
  • Scraps of various sport weight/baby yarn (I used the following:  Bernat Softee Baby in Flannel (G), Lion Brand Jamie in Little Boy Blue (B), Lion Brand Jamie in Light Yellow (Y), Bernat Softee Baby in Little Mouse (N))

Gauge:

9 stitches =13 rows = 2 inches Stockinette Stitch

The hat is about 14″ in circumference unstretched and stretches to about 19.”

Stitches Used:

Instructions:

Band:

Cast on 72 stitches with P, knit in round being careful not to twist

R1-R4:  (k2, p2) 18 times (72 stitches)

R5:  (tr, p2) 18 times (72 stitches)

R6:  (k2, p2) 17 times, k2, p1 (71 stitches), leave last stitch unworked, this stitch becomes the first stitch of the next row

R7:  (pr, pl) 18 times (72 stitches)

R8:  (k1, p2, k1) 17 times, k1, p2 (71 stitches), leave last stitch unworked, this stitch becomes the first stitch of the next row

R9:  (tl, p2) 18 times (72 stitches)

R10:  (k2, p2) 17 times, k2, p1 (71) stitches), leave last stitch unworked, this stitch becomes the first stitch of the next row

R11:  (tr, tl) 18 times (72 stitches)

R12:  k71, leave last stitch unworked, this stitch becomes the first stitch of the next row (71 stitches)

R13:  (tl, k2) 18 times (72 stitches)

Knit each following row until the hat is 5 inches long.

Crown:

R1:  (K4, K2tog, SSK, K4) 6 times (60 stitches)

R9:  K60

R10:  (K3, K2tog, SSK, K3) 6 times (48 stitches)

R11:  K48

R12:  (K2, K2tog, SSK, K2) 6 times (36 stitches)

R13:  K36

R14:  (K, K2tog, SSK, K) 6 times (24 stitches)

R15:  K24

R16:  (K2tog, SSK) 6 times (12 stitches)

Cut the yarn with several spare inches.  Thread a tapestry needle and pull yarn through all 12 stitches on needles.  Work in ends.

Owl (Adapted from Owl Keychain Pattern):

With G and size 0 hook ch3 and sl st to form ring.

R1:  Ch3, work 7 dc in ring, sl st in third ch of ch3 which acts as first dc (8 dc)

Fasten off G and work in ends.

R2:  With B sl st between any two dc from R1, ch2 (acts as first hdc), hdc in same space, 2 hdc in each space around, sl st in second ch of ch2. (16 hdc)

Fasten off B and work in ends.

R3:  With Y sc between any two hdc from R2, ch1 , (sc, ch 1) in each space around, sl st in top of first sc (16 sc, 16 ch)

Fasten off Y and work in ends.

R4:  With P sc in any ch 1 space from R3, sc in same space, ch 1, (2 sc, ch1) in each ch 1 space around, sl st in top of first sc (32 sc, 16 ch)

Fasten off P and work in ends.

R5:  With N sc in an ch 1 space from R4, 2 sc in same space, ch 1, (3 sc, ch1) in next 10 ch 1 spaces, 3 dc in next ch 1 space, 2 hdc in next ch 1 space, sc in next ch 1 space, 2 hdc in next ch 1 space, 3 dc in last ch 1 space, sl st to first sc (44 stitches)

R6:  Ch 1, turn, skip first stitch, sc, hdc, dc in same stitch, trc (mark stitch with extra yarn or stitch marker), dc in same stitch, sc in next 5 stitches, dc, trc in same stitch (mark stitch with extra yarn or stitch marker), dc, hdc in same stitch, sc, sl st

Do not fasten off.

With O, embroider beak as shown in picture.

Eyes (Make 2):

With K and size 2 hook, ch3 and sl st to form ring.

R1:  Ch 1, sc 8 in ring, sl st into first sc (8 sc)

Fasten off and work in ends.

R2:  With W, sc in a sc from R1, sc in same sc, (2 sc in each sc) around, sl st to first sc (16 sc)

Fasten off leaving long tail for sewing.  Sew the eyes onto the owl using the picture for placement.

Owl (continued):

Modified sc (msc):  When you insert your hook under top 2 loops of the stitch below, also insert it under the hat loop directly underneath the stitch on the owl, yarn over, bring loop through hat loop and owl stitch, yarn over and bring loop through both stitches on hook.

R7:  Ch 1, turn, msc in each stitch around, 2 msc in marked stitches, sl st in first msc.

Fasten off and work in ends.

Difficulty:  Moderate

Time Required:  5 Movies

Overall Experience:  Excellent

Hello Kitty Hat

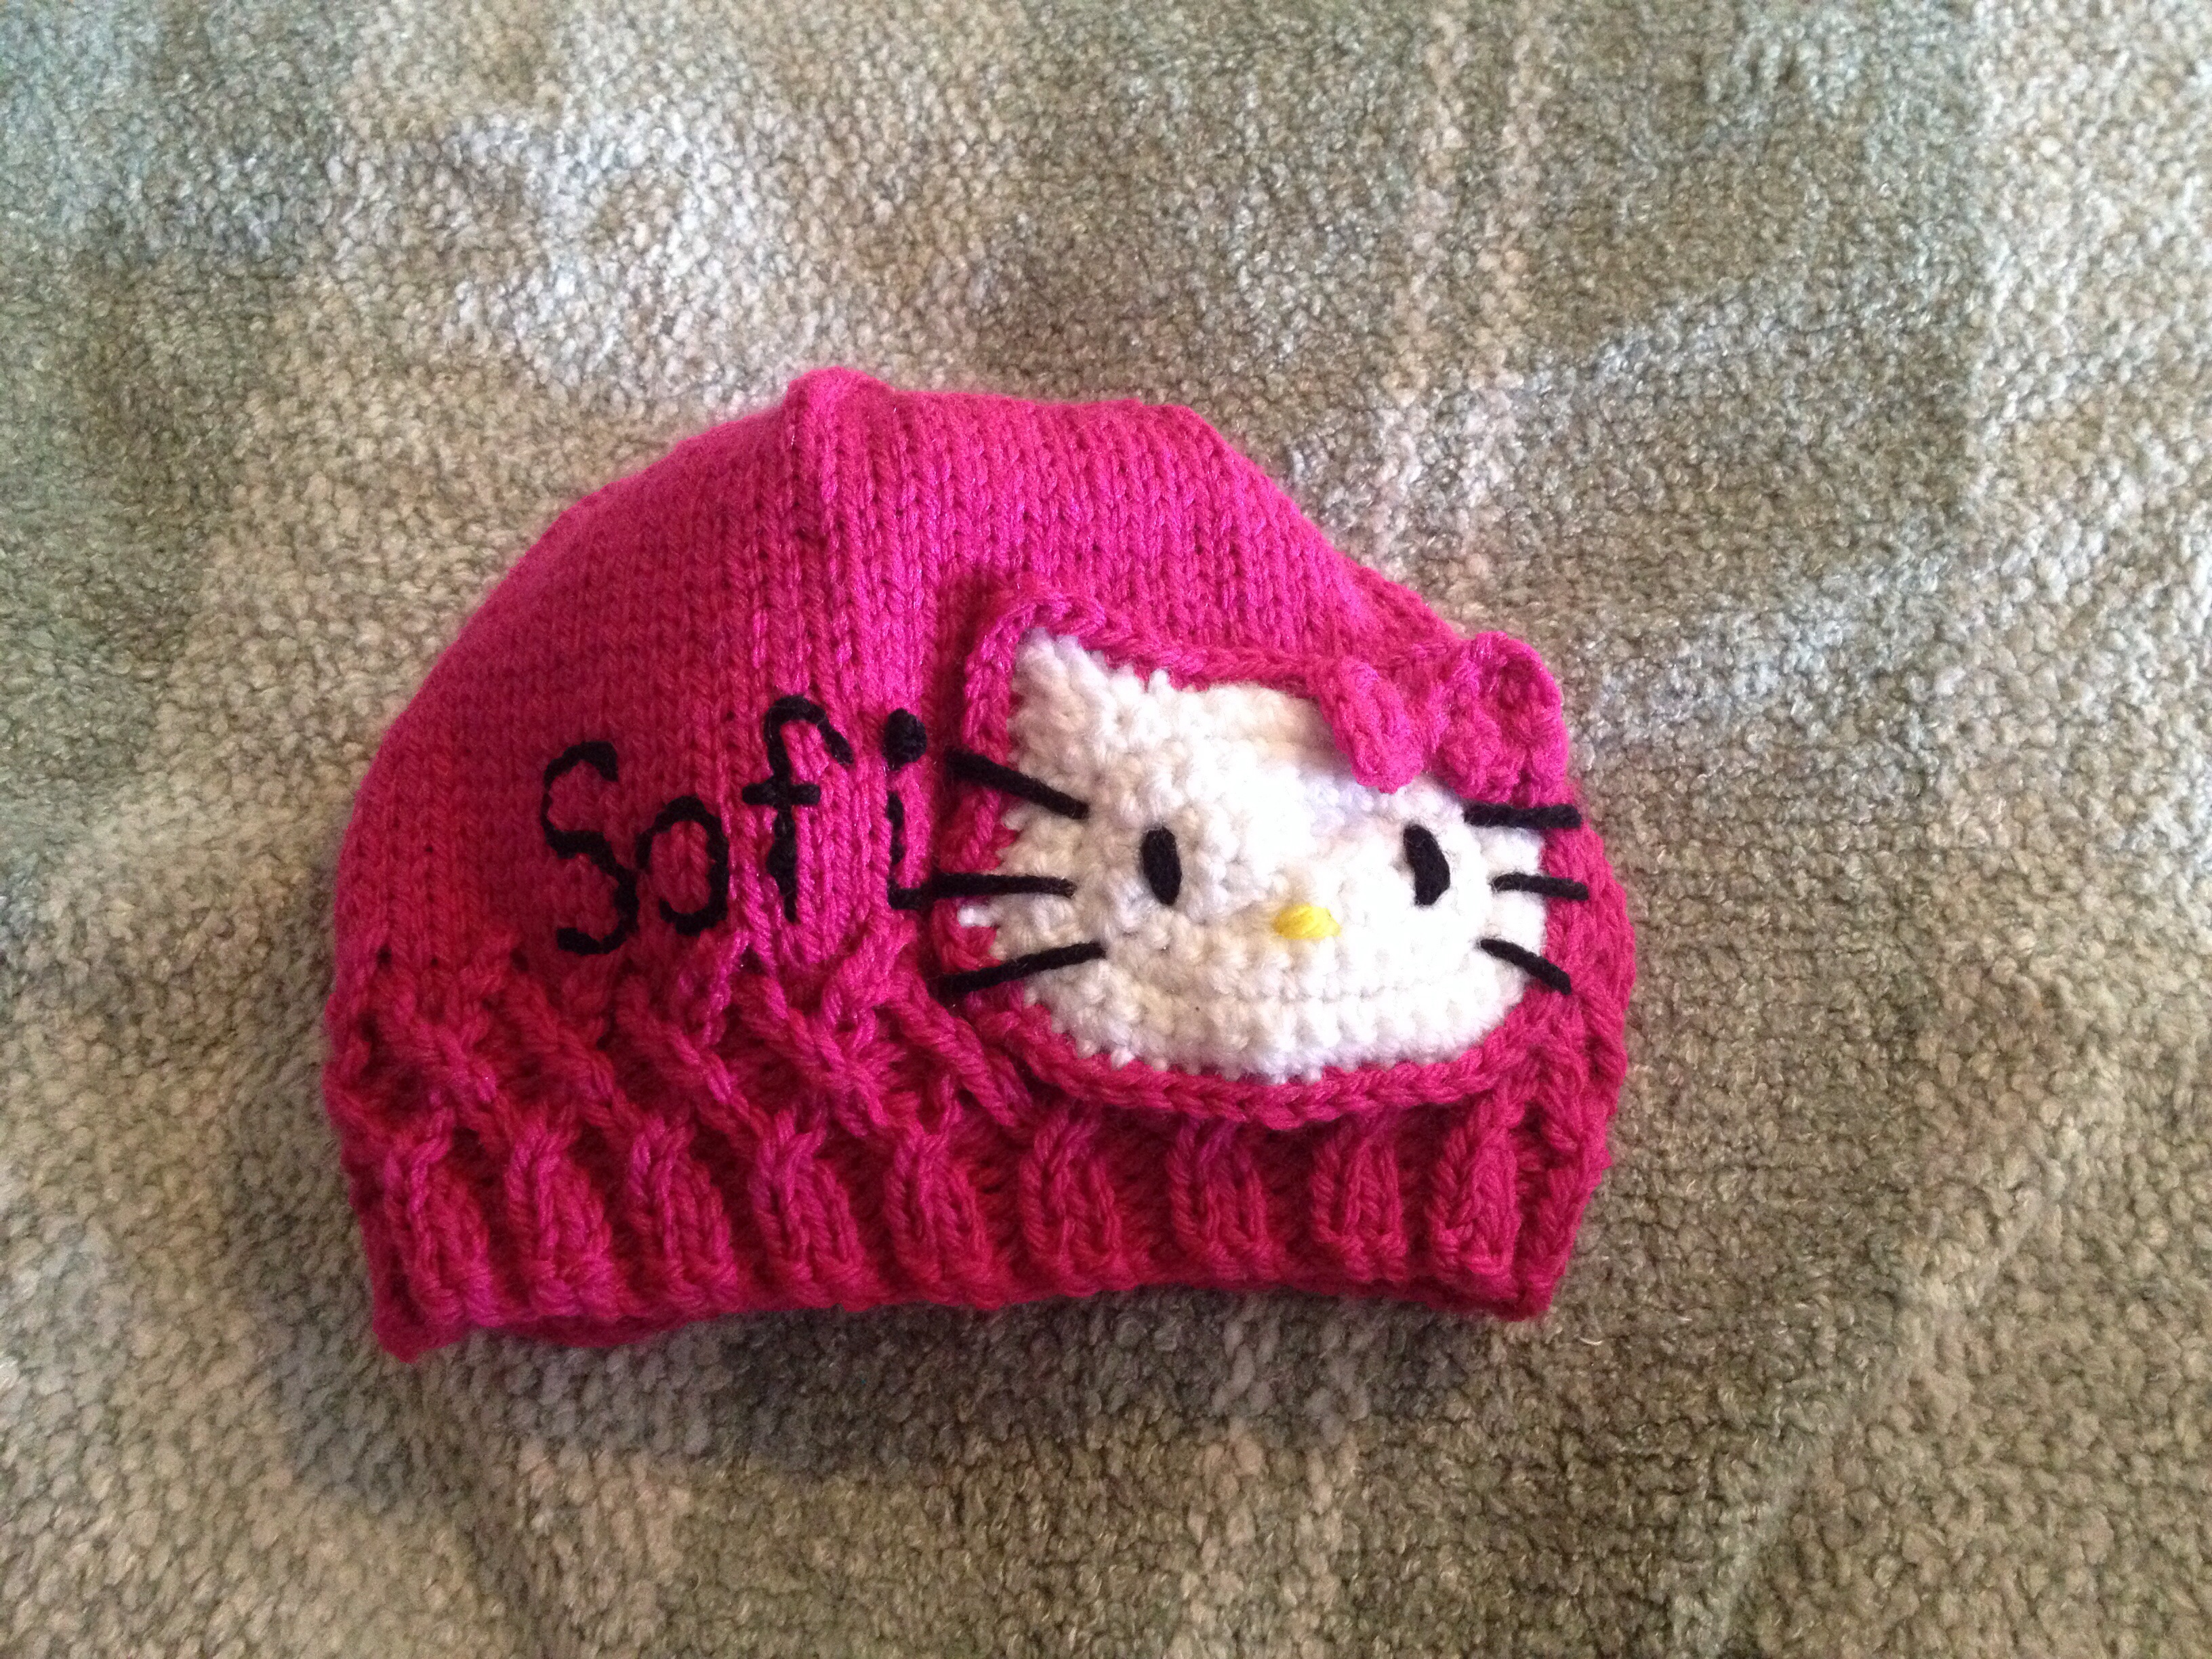
One of my coworkers asked me to make a Hello Kitty hat for his 3-year-old daughter.  He wanted it to be primarily pink rather than white (white and 3-year-olds don’t mesh well).  I knitted a hat and crocheted the Hello Kitty face from the Hello Kitty scarf that I made for my sister last year.  I chose a lattice pattern to put around the bottom of the hat to make the hat more feminine.  Afterwards, my coworker asked me to make the same scarf I made my sister.  I would have incorporated some gray into the hat as well if I was planning to make the scarf from the beginning.  The set did turn out really cute!

20140125-152935.jpg

Disclaimer:  Feel free to make this pattern for your personal use, for your platypus, for charity, or to sell.  The only thing I ask is that you please do not sell it on Etsy.  If you are interested in purchasing a koozie from my Etsy store, you may do so here.

Materials:

  • Vanna’s Choice Yarn in Berrylicious (P)
  • Vanna’s Choice Yarn in White (W)
  • Vanna’s Choice Yarn in Black (B)
  • Vanna’s Choice Yarn in Radiant Yellow (Y)
  • 5 Size US 7 Double Pointed Needles
  • Size H Crochet Hook

Stitches Used:

Instructions:

Band:

Cast on 84 stitches with P, knit in round being careful not to twist

R1-R4:  (k2, p2) 21 times (84 stitches)

R5:  (tr, p2) 21 times (84 stitches)

R6:  (k2, p2) 20 times, k2, p1 (83 stitches), leave last stitch unworked, this stitch becomes the first stitch of the next row

R7:  (pr, pl) 21 times (84 stitches)

R8:  (k1, p2, k1) 20 times, k1, p2 (83 stitches), leave last stitch unworked, this stitch becomes the first stitch of the next row

R9:  (tl, p2) 21 times (84 stitches)

R10:  (k2, p2) 20 times, k2, p1 (83) stitches), leave last stitch unworked, this stitch becomes the first stitch of the next row

R11:  (tr, tl) 21 times (84 stitches)

R12:  k83, leave last stitch unworked, this stitch becomes the first stitch of the next row (83 stitches)

R13:  (tl, k2) 21 times (84 stitches)

Knit each following row until the hat is 5.5 inches long.

Crown:

R1:  (K4, K2tog, SSK, K4) 7 times (70 stitches)

R2:  K70

R3:  (K3, K2tog, SSK, K3) 7 times (56 stitches)

R4:  K56

R5:  (K2, K2tog, SSK, K2) 7 times (42 stitches)

R6:  K42

R7:  (K, K2tog, SSK, K) 7 times (28 stitches)

R8:  K28

R9:  (K2tog, SSK) 7 times (14 stitches)

Cut the yarn with several spare inches.  Thread a tapestry needle and pull yarn through all 14 stitches on needles.  Work in ends.

Hello Kitty Face (from Made by K):

Switch to crocheting with W and crochet hook.

R1:  Ch5, sc in second ch from hook, sc in next 3 stitches (4 stitches)

R2: ch1, turn, 2 sc in next stitch, sc in next 2 sts, 2 sc in next stitch, 2 sc in bottom of same sc, 3 sc in bottoms of next 3 sc, sl st to 1st sc of current round (12 stitches)

R3: ch1, turn, sc, 2 sc in next stitch, sc x 2, 2 sc in next stitch x 3, sc x 4, 2 sc in next stitch, sl st to 1st sc of current round (18 stitches)

R4: ch1, turn, sc, 2 sc in next stitch, sc x 6, 2 sc in next stitch x 3, sc x 6, 2 sc in next stitch, sl st to 1st sc of current round (24 stitches)

R5: ch1, turn, sc x 2, 2 sc in next stitch, sc x 6, 2 sc in next stitch, sc, 2 sc in next stitch, sc, 2 sc in next stitch, sc x 8, 2 sc in next stitch, sc, sl st to 1st sc of current round (30 stitches)

R6: ch1, turn, sc x 3, 2 sc in next stitch, sc x 8, 2 sc in next stitch, sc, 2 sc in next stitch, sc x 2, 2 sc in next stitch, sc x 10, 2 sc in next stitch, sc, sl st to 1st sc of current round (36 stitches)

R7: ch1, turn, sc x 3, 2 sc in next stitch, sc x 10, 2 sc in next stitch, sc x 2, 2 sc in next stitch, sc x 2, sl st, hdc, ch1, dc in same stitch as hdc, ch 1, trc, ch 1, dc, ch1, hdc in same stitch as dc, sl st, sc x 4, sl st, hdc, ch1, dc in same stitch as hdc, ch 1, trc, ch 1, dc, ch1, hdc in same stitch as dc, sl st, sc x 2, sl st to 1st sc of current round and break off and work in ends (52 stitches)

Embroider eyes and nose on face using B and Y.

Hair Bow:

R1:  With P, ch5, sc in second ch from hook, sc in next 3 stitches (4 stitches)

R2:  Ch1, turn, sc 4 (4 stitches)

R3:  Ch1, turn, sc2tog twice (2 stitches)

R4:  Ch1, turn, sc 2 (2 stitches)

R5:  Ch1, turn, sc 2 in next stitch x 2 (4 stitches)

R6:  Ch1, turn, sc 4 (4 stitches)

R7:  Ch1, turn, sc 4  break off and work in ends (4 stitches)

Pinching center of bow together, sew the bow onto the face while wrapping the yarn around the center of the bow

Connecting the Face to the Hat:

Modified sc (msc):  When you insert your hook under top 2 loops of the stitch below, also insert it under the hat loop directly underneath the stitch on the face, yarn over, bring loop through hat loop and face stitch, yarn over and bring loop through both stitches on hook.

Hold the face in place on the hat.  With P, sl st to any stitch on R7 of the face, ch1, msc in same stitch.  Msc in each stitch on face except trc, place 3 msc in each trc, after completing all msc, sl st in first msc.

Embroider whiskers on face.

20140125-152957.jpg

Difficulty:  Moderate

Time Required:  5 Movies

Overall Experience:  Excellent