When I started posting wedding stuff, I should have started with this. Immediately after getting engaged, I found this adorable pin and knew that I had to proposed to my bridesmaids. This doesn’t even really count as a craft. All you do is get a small box, fill it with tissue paper, a ring pop, and a note “popping” the question. I only got to give one away in person. I had to mail the boxes to my other two bridesmaids.
Wedding Afghans
An acquaintance who had been in countless wedding once showed me a crocheted blanket that a bride had made her. She gushed about how that gift was the most meaningful bridesmaid gift she had ever received. Since I crochet, I tucked that little tidbit of information away for later. When I got engaged, I pushed my fiance to help me pick out colors so I could start on the pile of blankets I was planning on making.
I decided to make blankets for our three bridesmaids and both sets of parents. I had to make five blankets, so I needed to find an afghan pattern that I could make fairly quickly. I have made many afghans that took me months to make. I didn’t have that much time. I had an afghan pattern pinned named “Super Quick Throw.” The blanket was crocheted with four strands of yarn held together as one with a giant hook. That’s about as quick as one can hope for. The blankets crocheted beautifully.
I do have a few tips:
- The pattern is available free on the Red Heart website.
- I bought yarn in bulk in our wedding colors. I chose acrylic yarn because it holds up well and for the price. It crocheted into a stiff, scratchy blanket. However, after washing and drying each blanket once, they were completely transformed. They became pliable and soft.
- The pattern calls for a hook size P-16 (11.5 mm). I couldn’t find a hook this size and ended up with a 10 mm hook. I adjusted by crocheting to the correct size rather than the correct number of stitches. The pattern is easy, so it wasn’t hard to do. The rows that require a certain number of stitches have a three stitch repeat. There is a two stitch “border” on each side. This means that your starting row should have a total stitch number that is a multiple of 3 plus 4 stitches. (As written, the pattern calls for 58 stitches. This is a multiple of 3 (54/3=18) plus 4.) I don’t remember how many stitches I used. I think it was 70. Whatever gets you to a 48 inch wide blanket.
- I used the no foundation row starting technique instead of the chain start technique in the pattern. Here is a good tutorial. This technique keeps your tension from being off in the first row and is easier to measure your 48 inches.
- With the same “size verses stitches” philosophy, you should repeat Rows 2-7 until the blanket is the length you want. The pattern calls for 58 inches. I wanted my blanket to be at least 60 inches so I repeated until I finished on a Row 7 with a length greater than 60 inches.
- The edges of the blanket turned out a little jagged. I finished the blanket off with a border. I slip stitched in each stitch on the short edges and single crocheted along the long edges. This cleaned the blankets up nicely.
Difficulty: Easy
Time Required: About 13 movies per blanket
Overall Experience: Excellent
Groom’s Survival Kit
While searching for wedding things on Pinterest, I found many groom’s survival kits. Since I knit I really liked the idea of making socks for my groom, so he didn’t get cold feet. I put my own spin on the rest of items.
The typical groom’s kit list comes with a piece of paper that says something similar to the following:
Groom’s Day-Of Survival Kit
- Socks to keep cold feet away
- Lifesavers to keep you from drowning in emotion
- Small bottle of alcohol to calm your nerves
- Mints to ensure a fresh kiss
- Ring pop in case you forget the essentials
Looking at the list, there were lots of things I didn’t like about it:
- Socks–Loved the socks idea
- Lifesavers–Neither one of us are emotional people. I’ve been called a robot by several people, and he isn’t any better. He got me a shirt for my birthday that says: “Feelings are boring. Kissing is awesome.” Lifesavers were off the list.
- Small bottle of alcohol–I wasn’t sure when I would give this to him, and we got fined if we got caught with outside alcohol at the ceremony site. A small bottle of alcohol was off the list.
- Mints–This implies that he NEEDS a mint. I didn’t want to imply that he had bad breath. That seemed in poor taste.
- Ring pop–Apparently the essentials are that he buys my jewelry and/or candy? I didn’t like this one either.
That left me with one item. Socks. I decided to replace the items with different items that matched our personalities better. I wrote a note on a tag on each item. If you click on the pictures above you can see them. Otherwise, each note is listed below:
- Socks–So you don’t get cold feet
- Lip balm–For the perfect first kiss that tastes like me (I wear Burt’s Bees all the time.)
- Flask–In case you need courage of the liquid variety (that won’t get us fined…he could fill it at the venue)
- A bottle opener key chain that says: “I’LL LOVE YOU UNTIL THE ZOMBIES GET YOU”–So you know exactly how long I’ll love you
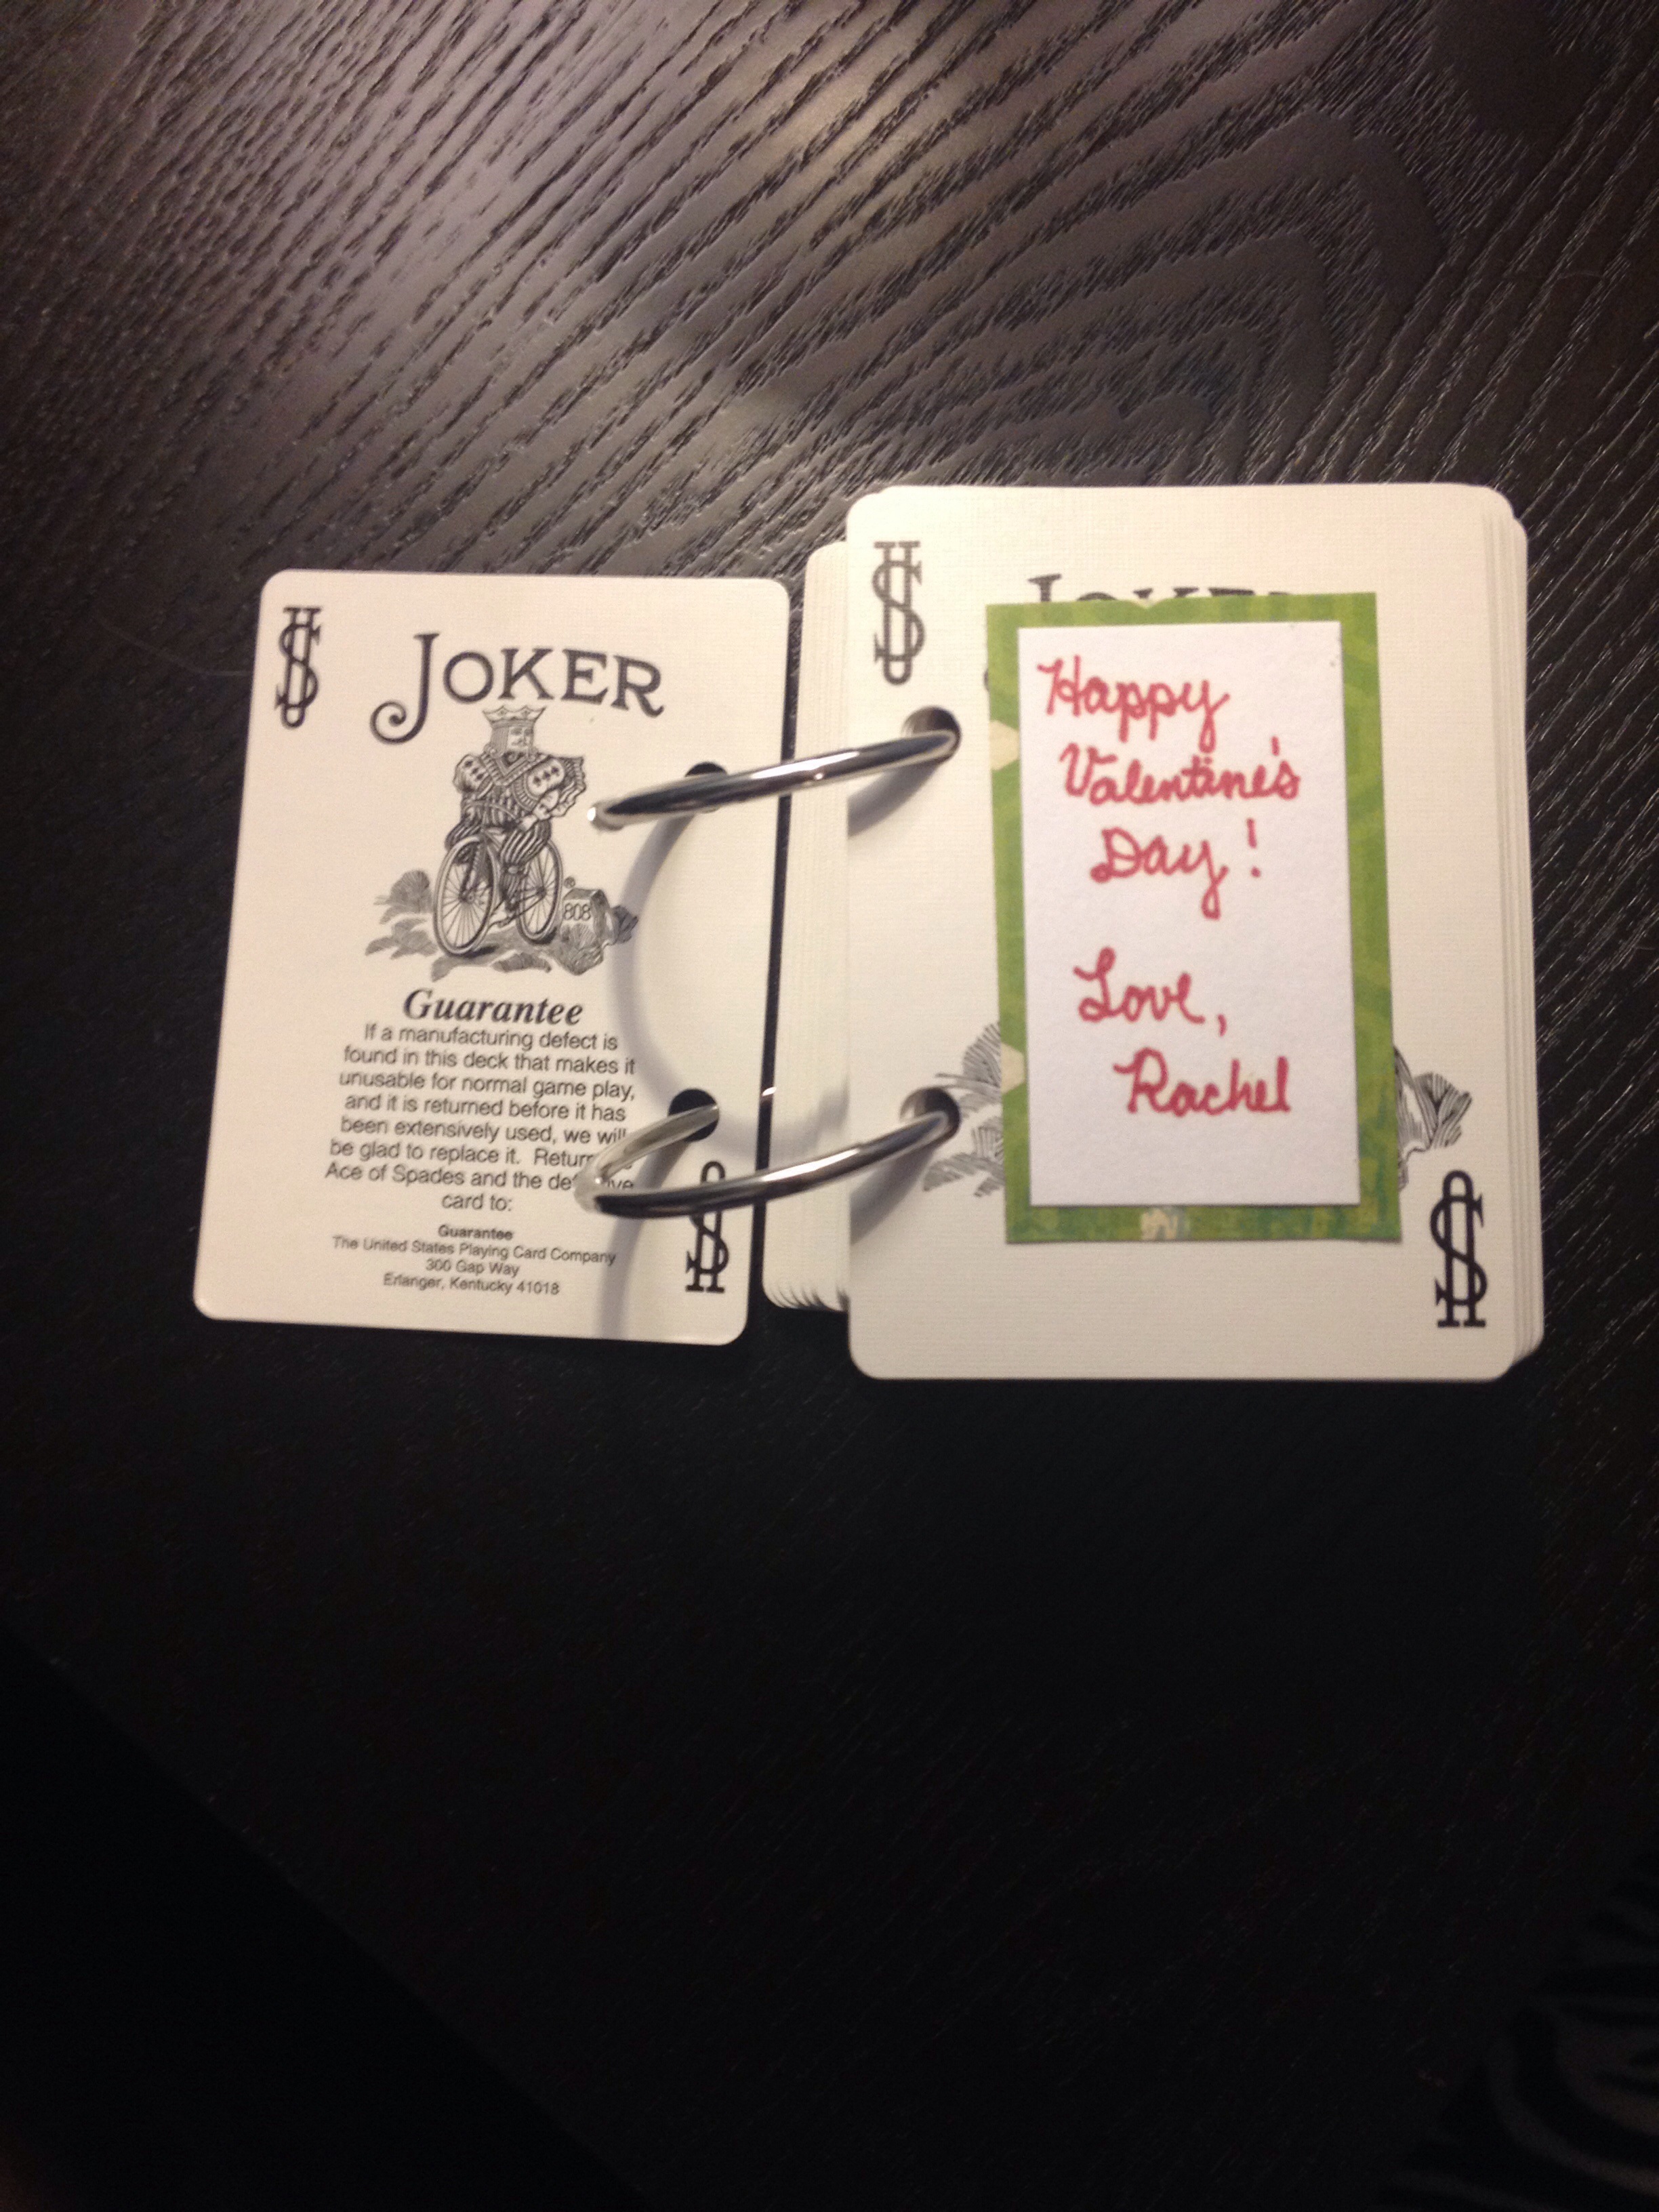
- 52 REASONS CRAIG IS AWESOME–So you remember where we began and why we are doing this
Each of the items (except the lip balm) was hand made, not necessarily by me:
- Socks–I made the socks. See my Don’t Get Cold Feet post.
- Lip balm–I actually had an unopened lip balm laying around because I buy them in bulk.
- Flask–The flask came from Scoutmob.com. Scoutmob is a site that features products by independent makers. It’s pretty cool. Check it out.
- Key Chain–The zombie key chain came from Etsy. The maker, FleurDesigns, was great to work with. I got the key chain crazy fast.
- 52 Reasons Book–I made the book during our first Valentine’s together. See my 52 Reasons Book post.
52 Reasons Book
Note: While this does not appear to be a wedding related post, it will become relevant in a later post.
This was in fact the first pin I ever brought to life. A couple of years ago I saw Pinterest start popping up all over Facebook. I understood it to be a digital pin board where one can organize his or her ideas. I don’t keep real notebooks or pin boards, and didn’t see the point of a digital one. One day I was bored and decided to see what all the hype was about. I was immediately hooked. There were SO MANY craft and recipe ideas.
I started using Pinterest about a month before Valentine’s Day. This would be my first Valentine’s Day spent with my now husband, Craig. We hadn’t talked about Valentine’s Day gifts. I wanted my gift to “match” his. I didn’t know if he was getting me anything. I found this adorable idea on Pinterest. I decided to make him this and bake something.
Materials:
- A deck of cards
- Scrapbooking paper
- Multi-colored pens
- Scissors
- Hole punch
- Binder rings
- Scrapbooking glue dots (or adhesive of choice)
Instructions:
- Make a list of 52 reasons you love your man
- Cut 54 pieces scrapbooking paper to an appropriate size (the amount of playing card you want behind the paper is totally up to you)
- If you want the border look I used, cut 54 solid color pieces of scrapbooking paper slightly smaller than a patterned piece
- Write one reason on each piece of solid paper
- Write a title and an opening message on the remaining pieces of solid paper
- Glue the solid pieces of paper onto the patterned pieces of paper
- Choose the location for the binder rings and hole punch each card
- Remove the two jokers from the deck (these will be your front cover and your message page)
- Glue a message on each of the normal 52 cards
- Glue the opening message on one of the jokers
- Glue the title on the back of one of remaining joker
- Put all of the cards on the binder rings
Difficulty: Easy
Time Required: 2 movies
Overall Experience: Excellent
XKCD pretty much described my dilemma.
Melt in your Mouth Chicken
So… it turns out that I’m cooking a lot this week. I found Melt in your Mouth Chicken on Pinterest. It sounded good, so I made it. I’m not overly salt sensitive, but I found the chicken to be extremely salty. It was so salty that I found myself taking a drink after every bite. I adjusted the recipe. It now has a great flavor, and I’m not overwhelmed with salt. It’s also super easy to make.
Ingredients:
1/2 cup of Parmesan cheese
1 cup of plain Greek yogurt
1 teaspoon of garlic powder
1/2 teaspoon of seasoning salt
1/2 teaspoon of pepper
2 lbs of chicken tenders
Directions:
- Preheat the oven to 375 degrees
- Wash chicken tenders, trim any unwanted portions of chicken, place in bottom of baking dish
- Mix the remaining ingredients and spread on top of chicken
- Bake for 45 minutes
There is one oddity. When the chicken comes out of the oven, you will find that it is sitting in quite a lot of water. This has happened every time I have made the dish. See the picture below.