Crafternoon Tea Preemie Hats

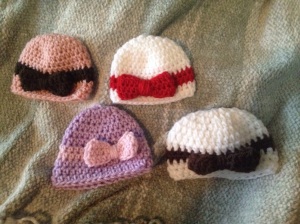
Some ladies in my Sunday School class are interested in learning to knit and crochet.  We decided to add a missions component to the learning experience and make preemie hats to donate to local NICUs.  We had our first meeting yesterday and it was a blast!  We taught some crochet skills and made some hats.  I wanted to show off some of the hats and give the ladies some digital resources concerning what we learned yesterday.

20140406-153518.jpg

Stitches Learned

Yesterday we taught the basics of crochet to the beginners.  We taught some combination of the following stitches.  If you didn’t learn all of them, no big deal!  You can learn them next time.  If you have any questions, feel free to ask Shanda or me anything you would like.  The links below describe the stitches using words and figures.  The Crochet Crowd also provides a great series of YouTube videos for beginners.  After you learn these basic stitches, you can make any of the hats featured above!

Patterns

I had several patterns printed out yesterday and wanted to make them digitally available to everyone.  I found these patterns on Ravelry, which is a great source for everything knitting/crocheting.  If you join Ravelry, friend me!  My profile is here.  Feel free to be creative with the patterns!

Micro Preemie Hats – Crochet

Both of the hats we made have an added on edging.

20140406-153750.jpg

Wrapped with Love – Crochet

20140406-153532.jpg

Baby Cowboy Hat – Crochet

This turned out looking a little more like a Fedora than a cowboy hat.  I might edit it a little next time I made it.

20140406-153915.jpg

Baby Bear Hat – Knit

I made one edit to this pattern.  The pattern calls to knit until the hat is 6″ long.  That is very long for a preemie hat.  I knit it to 4.5″.  It looks about right.

20140406-154110.jpg

Preemie Football Hat – Knit

20140406-154027.jpg

Enjoy the patterns and feel free to ask me questions!

20140406-153518.jpg

Mad Hatter Crochet Challenge – Absolem

I posted last week about the Crochet Crowd’s Mad Hatter Crochet Challenge.  Since I really enjoyed the creativity of designing the decorations for the first hat, I decided to make a second hat.  I chose to base the hat on Absolem, the hookah smoking caterpillar in Tim Burton’s Alice in Wonderland.  I knit the hat holding together two colors to achieve the look of a smoke-filled teal and grey background.   I crocheted the brim of the hat in a tan color to resemble Absolem’s mushroom and embroidered spots on the mushroom.  I free crocheted Absolem’s head and body and embroidered all of his features before sewing him on the side of the hat.  I also free crocheted the hookah and smoke rings.  He turned out beautiful.  My gauge was a little off on the the first hat, so I went down a hook size for this hat.  The shape of the hat turned out a lot better.

20140406-101318.jpg

20140406-101426.jpg

20140406-101446.jpg

20140406-101510.jpg

DIY Wedding Belt

I spent months looking for the right wedding belt.  I ended up making my own.

DSC_9570v3

DSC_9570v2

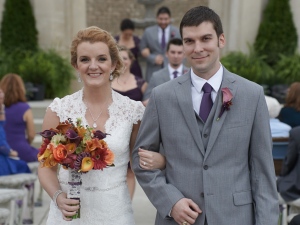
I absolutely loved the back of my dress…the keyhole back…the button details…everything about it really.  When I was trying it on, I tried on a sparkly sash with it.  I really liked how the sash broke up all of the lace on my dress, but I didn’t like the idea of a giant bow covering up the back details.  I also didn’t like the $300 price tag on most of the sashes.  For months I looked for a small, sparkly belt that WAS NOT a sash and had diamond-looking stones all the way around it.  I couldn’t find anything.  Next I started hitting up my typical craft stores looking for trim to make my own belt.  I struck out there, too.  Finally I found shinetrim.com.  This website has many rhinestone bands for a fraction of the cost of the sashes.  I purchased a yard of rhinestone band (so I had extra in case I messed up) and a rhinestone clasp to go in front.  I simply cut the band to fit my waist and sewed it to the clasp.  It was super easy and gave the exact look that I wanted.

DSC_8183

Wedding Rehearsal Ribbon Bouquet

I took a hiatus from my blog immediately prior to and following my wedding.  I got crazy busy, as I assume most brides can understand.  Now that all of the wedding craziness is over, I have so many things to post!  I made almost all of my wedding decorations and gifts.  I’m still waiting on my mom to send me my sister’s pictures (she was instructed to take pictures of everything I made for my blog), but there are a few things I can post in the mean time.  I plan to kind of go in chronological order as things were used during the wedding weekend.  Hopefully I don’t miss anything that way.

The first homemade item to make an appearance was my rehearsal bow-quet.  It’s been a long-standing tradition that a rehearsal bouquet be created from the ribbons from the wedding shower.  I made one.  I’m a little unhappy that this is going to be the first thing to go on the blog.  I ended up not having a ton of time to work on it and quickly threw it together the night before the rehearsal.  I do think the idea would be really cute if fully implemented.

Ribbon Bouquet 4 - Copy

My goal was to make a whole bouquet of ribbon rosettes and wrap any leftover ribbons around the stems.  Since I was short on time, I only made three rosettes and wrapped the rest of the ribbons around.  The rosettes were overwhelmed by the other ribbons.

Materials:

Instructions:

  • Make the desired number of rosettes.  (I used the same technique to make the ribbon rosettes that was used to make the burlap rosettes in my Burlap Roses post.  The technique is described in Snug as a Bug Baby’s blog.  I honestly don’t think I can do a better job describing the technique than she does, and since I did it very last minute, I did not take the time to take pictures of every step.  For this project I used a needle and thread instead of hot glue.  The concept is the same, simply stitch each “petal” in place instead of gluing it.  The three rosettes turned out really cute.  I just wish that I had time to make more of them.)
  • Wrap the rosettes in any remaining ribbon

Difficulty:  Easy

Time Required:  10 minutes per rosette

Overall Experience:  Good.  I wish that I had time to make more rosettes

Ribbon Bouquet 4 Ribbon Bouquet 3 Ribbon Bouquet 2 Ribbon Bouquet 1

Cross-Stitch Portrait

I’m a big fan of the site Uncommon Goods.  As the name suggests, the company carries fun unique products.  A few months ago, I was pleased to see a cross-stitch item advertised.  I rarely see cross-stitching anywhere and greatly enjoyed it as a child.  The site offers custom cross-stitched portraits for the staggering fee of $175-$225.  I was shocked at the price.  The designs, while adorable, were extremely simple.

Cross-Stitch Portraits

Two of my friends, Nathan and Lara, were going to be married so I decided to make them a cross-stitch portrait to add to their wedding shower gift drawing inspiration from the Uncommon Goods portraits.   The pattern I developed is shown below.  (Click on the pattern to make it larger.)  The bold lines represent backstitching and the triangles are French knots.  The other symbols represent cross-stitching in different colors.  If you choose to follow the pattern, any color may be used.  I chose colors that matched Nathan and Lara’s wedding colors (pink and navy).


Portrait Cross-Stitch Pattern

Nathan&Lara

Difficulty:  Easy

The project is about as easy as cross-stitching gets.

Time Requited:  2 Movies

Overall Experience:  Excellent

The project was fast and simple.  Nathan, Lara, and everyone at the shower loved it.